How to Import Contacts into BluePro
Contacts are essential for managing your clients, leads, and more in BluePro. Importing them from a CSV file helps streamline onboarding and saves time. This guide walks you through the process step by step.
Why Import?
Importing contacts in bulk lets you:
- Quickly onboard existing clients
- Maintain consistent formatting
- Populate key fields for quotes, jobs, and notifications
Step 1: Prepare Your CSV File
CSV File Format Requirements
Use a spreadsheet or text editor to create your CSV. We recommend your column headers are as follows:
| Field | Required? | Description |
| First Name | Yes | Customer’s First Name |
| Last Name | Yes | Customer’s Last Name |
| No | Email address | |
| Phone | No | Phone number |
| Address | No | Street address |
| Address 2 | No | Apartment, Suite, etc. |
| City | No | City |
| State | No | State or Province |
| Zip | No | ZIP or Postal Code |
| Country | No | Country Name |
| Company | No | Business or Company Name |
Save the file in .csv format (Comma-Separated Values). Avoid merged cells or formulas to ensure proper import.
Step 2: Open the Import Tool
- Navigate to the Contacts Module: From your BluePro dashboard, go to the Contacts section in the left-hand menu.
- Open the Import Menu: Click the ‘…’ (three-dot) icon in the top right corner of the Contacts page.
- Select ‘Import Contacts’: Choose Import Contacts from the dropdown menu.
- Upload Your CSV File: Select your prepared CSV file from your computer and upload it.

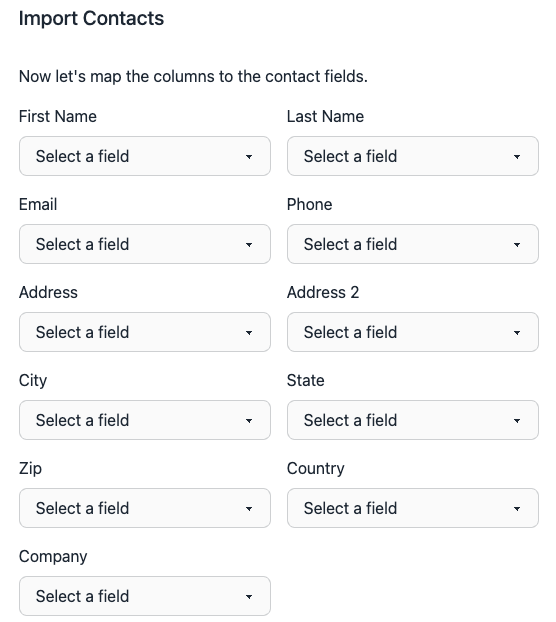
Step 3: Upload & Map Your File
- Click Choose File and select your CSV.
- The system will preview how headers map to fields.
- Confirm that each column is correctly aligned.
Step 4: Perform the Import
- Once confirmed, click Import.
- Depending on file size, the process may take a few seconds.
- When complete, you’ll see a confirmation message and your contacts will appear in the list.
Tips for a Smooth Import
- Save your file as .csv (Comma Separated Values) format.
- Avoid any merged cells, formulas, or extra tabs.
- If unsure, download a sample CSV template from the import screen.
Need Help?
If your import isn’t working or you’d like BluePro to handle it for you, email our support team at [email protected]—we’d be happy to help.